
by Marvin Denmark and Robin Koontz
I’ve always been interested in suspension bridges. But, since I grew up in flat country in central Texas, there were no examples I could look at. So it’s difficult to frame a time that bridges became more than just an interest.
It was probably when we purchased our property in western Oregon. A fair sized creek bisected it almost in two equal halves, making the half across from the home-site inaccessible without swimming across the creek. Plus, that half was on a rising bluff above the creek and now contained a replanted forest.
I pondered putting in a “vehicle” bridge. The problem was, we didn’t have that amount of money, having “just bought the farm” and were broke. But we had a more pressing issue that required access across the creek. The farm had always gotten its water from a spring across the creek and up that hill, and it needed to be easily accessible for maintenance and other issues. We needed access summer or winter, no matter what the weather or height of the creek. So, I decided to build a suspension bridge.
Humans have always built bridges. As soon as they moved from one continent to another, upon finding suitable land, they set out to make it theirs. If there was water to cross, they either built boats, a ferry, or a bridge. Early bridges would have been constructed from all natural materials. The main cable would probably be a thick, lengthy vine, or rope that was woven from fibrous plants, along with the same for the dropping “cables” (suspenders). Posts would have been strong, durable, rot-resistant trees. Cross beams and deck planks also came from trees and branches, or more readily available bank-side trees. The skills and construction knowledge would have been passed down generation to generation. One family could have been known as the bridge builders. Skills would have been honed and maintained by the constant necessity of maintenance or damage repair.
Since the Industrial Revolution, materials technologies have brought us a wide array of materials that suspended bridges can be built from. For example, at one time some bridges were built using chains or steel rods with an eye on each end linked together. Methods of construction have followed the materials knowledge and then leaped ahead to push the materials to new “limits.”
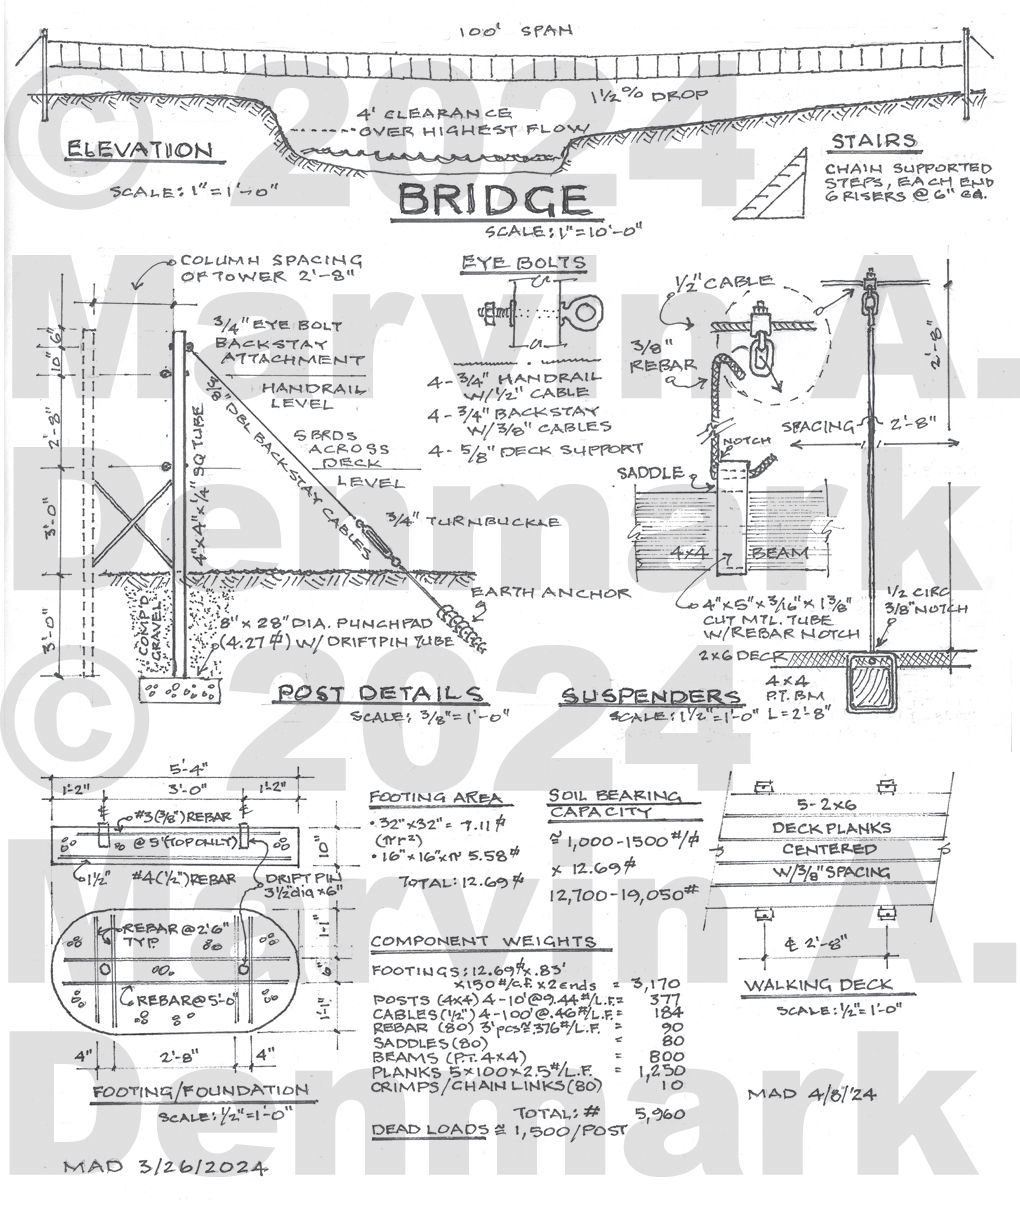
My bridge is based on time-tested materials and simple methods of construction much of which can be built and assembled off-site. All of the materials are ubiquitous throughout the world; you can pretty much find them in any corner of any country. I took a cue from Bridges to Prosperity: try to only use materials that can be sourced readily to where you are building your bridge.
I am going to go through each portion of this bridge as depicted in the drawing. This will be done in an order as any builder would follow, after having a design/plan. I’ll begin with the foundation, then I’ll get into the support system which includes the posts/columns. Next come the cables that span between the posts, followed by the dropping “cables” that hold up the deck system (this design is using rebar for the dropping cables). Next I will discuss the beams that the deck planks will fasten to, and finally the planking itself (the walking deck).
Over the next few months, I will publish all of this information with photos and illustrations right here on this blog. I’ve already begun work on the bridge and will post photos showing the progress. Once the bridge is completed, my partner Robin Koontz and I plan to put it all into another book. That way, readers will be able to get all the information they want free, from this blog. And, if they want something put together to refer back to, they can also purchase the book.
So, stay tuned! I’ll get to the foundation next.
Images, diagrams, and text copyright ©2024 by Marvin A. Denmark unless otherwise noted. Be a good person: please do not copy and post my content anywhere without my expressed permission. Thank you.
