

I read an article about making soil cement decades ago, possibly from an issue of Mother Earth News. I thought I might want to try it someday. The wood-framed panelized yurt that we built recently was the perfect place for the experiment. The idea of a “dirt floor” seemed to go well with the setting and the unique building. Plus, I could form it in twelve sections, just as the yurt is 12-sided.
Note that this is not the commercial soil-cement used by some highway departments, which uses sand and crushed stone with the soil and cement mix, making it basically concrete with soil added. They might use other waste materials as well, such as cinders and fly ash.
Since I had discarded the article, saving only the “recipe,” I did a couple of tests first. The mix ratio from the recipe was different from what I settled on. The original recipe called for less cement by volume (5:1) and the amount of water was less. The calculated volume of material for one of the 2-1/2 inch thick wedges was 3 cubic feet. This proved to be inaccurate when using our soil. The loose, crumbly clay soil turned out to need four cubic feet to allow for all the air pockets. So, adjustments were made, settling on a mix of four cubic feet of soil to 1 cubic foot of cement for one wedge.
We divided each wedge pour into 1/4 cubic foot of cement to each cubic foot of clay soil, making a total of four pours per wedge. The water mix would be whatever made it workable, but originally was figured to be less than two gallons.

My first test sample, a very small amount comparable to the 4:1 mix with the water equivalent to the original recipe turned out fine in the test, but proved to be way too dry in the first wedge we mixed and poured. So, the amount of water became an evolving test as we mixed and poured the subsequent wedges. Generally, two gallons per mix worked with adjustments made for damp soils or dryer soils. Even though all the soil came from one pile, the moisture content varied.

I made two tests. I painted one of them with concrete stain just to see how we liked that. We didn’t. The natural color was just the look we wanted for the yurt floor.
Materials needed
This is a list of all the materials and tools we can remember using. The amounts of soil, cement and water needed are detailed in the instructions.
Soil
Cement
Water
Vessels for storing sifted soil
Wheelbarrow for mixing
Shovel
Hoe
Small shovel for scooping and cleaning out last bits
Strong bucket
A variety of concrete trowels, i.e. margin, brick, rounded finish, long finish
Tamper
Fence wire
Plastic sheeting
Tape
Wood and hardware for forms
Step 1 Build the Form

The first step was to make forms. My plan was to pour the wedges from the back of the yurt to the front, every other one. The forms were simply screwed to the yurt deck. They could be easily moved for each subsequent pour. Once six were done and cured enough, then we’d just fill in the final six wedges. The middle was left to put in something fun for a center focal point.
The center was six-sided while the yurt was 12-sided. Due to this, the forms would meet at a corner point, and the center of one of the six sides, thus being different lengths and angles. I made each a little short and used wedge shims to bring them tight. This also made it easier to remove when the pour was cured.

You could use this form system to pour a square or rectangular form by deciding how large a pour you wanted to do for each section.
Step 2 Bring in the Dirt

I brought in what I estimated to be more than enough sandy clay soil for the project, about 2-1/2 cubic yards. I dug it up on our property, but dirt can be found where excavation projects are going on. Just about any kind of earth can be used, as long as it contains clay and sand. It should be free of organic material and debris.

I tested my soil by filling a jar half full of sifted earth and adding an equal amount of water. I covered the jar and shook it for a few minutes then allowed it to stand undisturbed for an hour or so. Once settled, the soil will have separated into layers of sand on the bottom, clay in the middle and silt on the top. The ideal mix is when there is about 75% sand and 15-20% clay. I did several tests and got different results each time. In this photo there is about 50% sand and 50% clay and silt.
Step 3 Sift It, Sift It Good

Once we carved some time between other summer/early fall projects, Robin started sifting. She started by just chopping at the dirt with a hoe, but then figured out one of her plastic greenhouse trays would do the job and give us a more consistent product. After the first pour, we determined that each wedge would require almost 4 cubic feet of dirt. I had built a 12x12x12 inch (a cubic foot) box to measure the volumes. Robin got the four batches ready in advance of each pour by just filling the box with sifted dirt and storing in various holding containers.


Step 4 Mix It Up

The soil went into the wheelbarrow first, then the cement was added in furrows I made in the soil. I mixed that up using a hoe, chopping at it about 2 inches at a time from front to back so that the cement was well dispersed throughout the soil. Dry mixing continued until I couldn’t see any “orange” clay or “grey” cement bits.

Then I added two gallons of water and mixed until we had a batch that wasn’t soupy, but not too dry. We found that the wetter the mix, the better.
Step 5 Get Down and Get Dirty
Since the yurt has a few steps up to it and neither of us have terrific knees, Robin filled the bucket with about three shovel scoops and hauled it up to me inside the yurt. I slopped down the glop and handed back the bucket. One wedge, which was four batches of mix, took about two hours including a break after the wire reinforcement was tamped in after the second pour.
Since we’d have four pours for one wedge, I worked from the back to the front. After two pours, I spread it all out evenly, using a brick trowel to move big blops around and a margin trowel to semi-smooth it all.


Step 6 Start Spreading the Mud
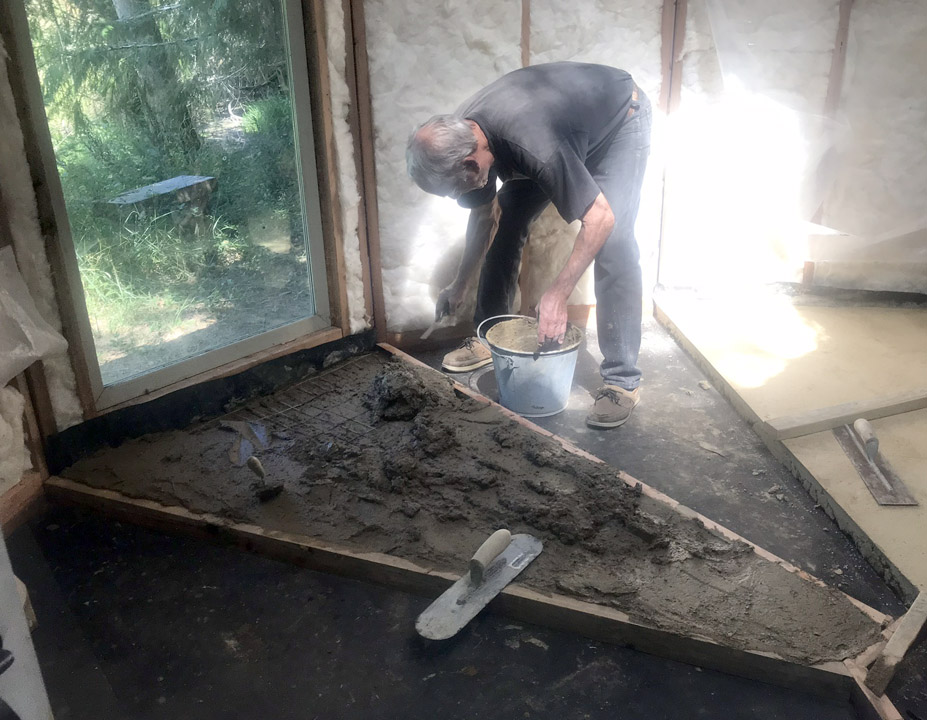
Even though we used the same proportions of dirt, cement, and water for each pour, the consistency varied wildly. After the first couple of wedges, we decided we liked the wetter consistency and I started adjusting the amount of water depending on what happened with the mix. The wetter blend, about the consistency of Sloppy Joe mix, was easier to shovel and work with, plus those wedges were not as prone to cracking, which did happen on several early pours.
Step 7 Add Wire Reinforcement
I had no idea if soil cement cracks the way concrete can, but I figured reinforcement would help by containing the separation if it did occur, holding all snug together. I made a jig to simplify cutting the reinforcement wire, cut 2×4 grid fence wire in three pieces (this made the best use of the material), positioned it carefully, then tamped it into place. It was tamped to get any high ends down and to embed it into the first layer.


I made my tamper from a short approximately 8 inch piece of cedar tree trunk, a hole drilled in it to accommodate a broom handle.

Step 8 Get Back to the Dirt at Hand

While I tamped, Robin loaded the next cubic foot of dirt into the mixing wheelbarrow and measured out the cement. If she had the energy, she also started sifting dirt for the next wedge. We scheduled two wedges a week, weather permitting. We got behind when wildfires in Oregon caused our air quality to become unsafe for breathing, but after a couple of weeks we were able to return to the task. We got rained out a few times as well.
Step 9 Screed It!

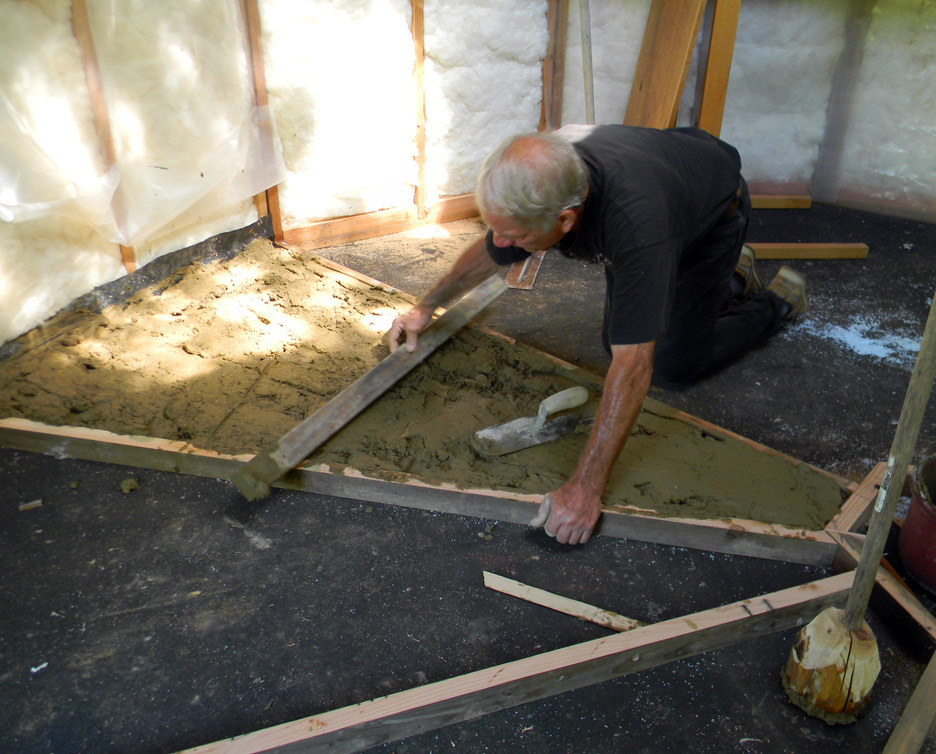


Once we poured the fourth batch into a wedge, it was time to screed. I screeded using a 1×3, just as I would for traditional concrete. The “sawing” motion while advancing the screen board forward used in working concrete didn’t work very well. When screeding the soil cement, I found that it didn’t pull along like a concrete mix does. It tended to suck the “mud” from behind, pulling it away from the forms and scraping the surface off behind. The “mud” also built up in front, making it difficult to move it forward. I worked out a method using a margin trowel to remove the material from in front without taking too much.
Step 10 Finish It!

When I got it fairly close, I used a finishing trowels to begin smoothing it out. When working it you can get the surface to pull along to lower areas. Occasionally, air bubbles would develop, and I just punctured them and filled with a little excess mud. When I had it acceptably flat, I used a concrete finish towel to get it smooth. It can be worked to a very smooth surface, but I didn’t attempt to do that.

For the areas between the formed wedges, I taped plastic sheeting to the wedges on either side to keep the mud from adhering to the finished wedges and to keep them clean.
Step 11 Do Something With the Leftovers!

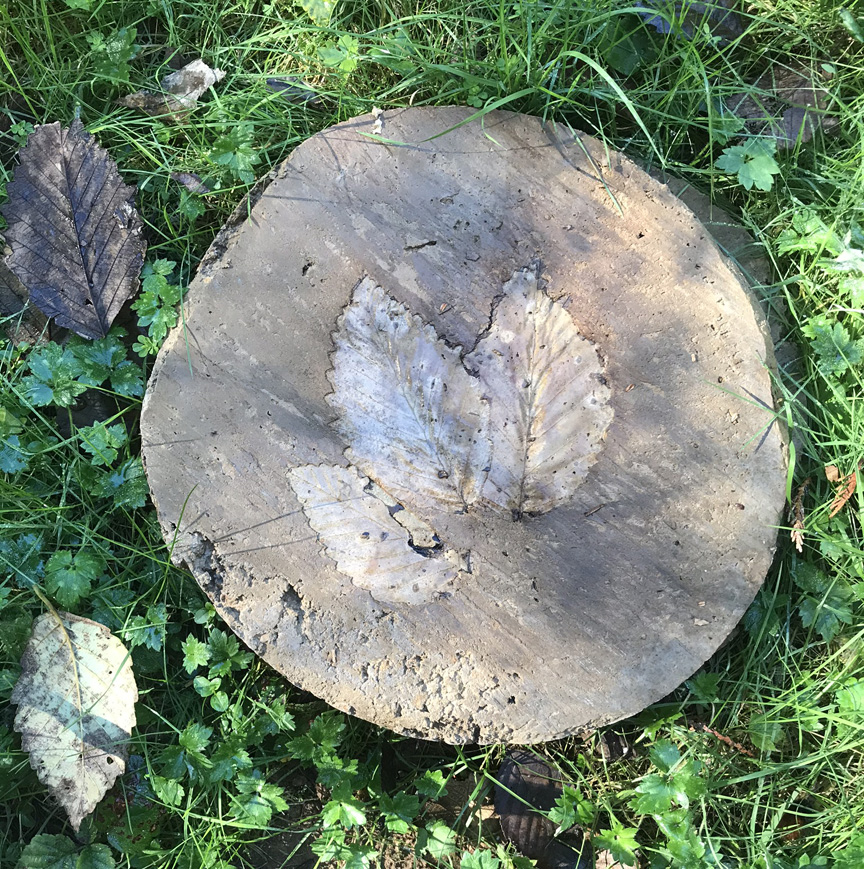

Four cubic feet was just a little more than we needed, so we used metal flashing and clamps to make forms for stepping stones. We added leaves to give them a fun look. I have no idea how they will hold up in the rain and freeze, but I guess we’ll find out!

In conclusion, a crew of two old fahts did take a few weeks to accomplish soil cementing a 200 square foot area, but it’s a unique and durable floor. Plus it adds mass to the building to help maintain a comfortable temperature inside. I’m working on my middle piece now and will post an update when it’s done!
If you’re interested in how I built the rest of the yurt, we published a book. Here are the links:
Building a Wood-Framed Panelized Yurt, in color
Building a Wood-Framed Panelized Yurt, black & white

Text and photos on this blog are copyright ©2020 by Marvin Denmark and Robin Koontz. As much as we love to share, please ask permission before re-posting. Thank you!
